This is a blog I have been meaning to write for some time now, but been slow (lazy) to get there, and![]()
such a great story too!!! OK, let me frame up a story. It all began over 1 and half years ago. My company acquired an amazing contract with a fortune 100 client looking to rebuild their ecommerce site based on hybris Commerce Platform, a mature and powerful ecommerce solution, leader in all accounts. (selfish plug: checkout my hybris blog, hybris Blank, as I dive deep into the features it provides, as a non-coder) The client’s team in the APAC region grew exponentially over the time period, resulting from just a handful of stakeholders to over 20 people. As our company was the sole provider of both site maintenance and development of new features, we grew as well and needed powerful tools and processes to help control flow of requests. In comes JIRA provided by Atlassian. This blog will be part of a mini-series how we developed a successful project management solution using JIRA. The following article provides a glimpse into the founding blocks of the project, and future articles will describe in detail how we built and ran the solution through JIRA.
As mentioned, not only has the client’s list of stakeholders grew, so did the team supporting the site. As such we grew as well and eventually divided the enormous team into 2 silos:
- Marketing and Production: This team helped maintain the site on a daily basis, producing new content and launching new campaigns just to name a few of the tasks.
- Platform: This team focused on new features of the site and bug resolution that was not content related
The teams also had shared resources that included:
- HTML
- BA (Business Analysts)
- QC (Quality Control Team)
So with so many teams involved, how do we organize all the information while still providing the client and management team sufficient view into the activities? That’s where JIRA and JIRA Agile comes to the rescue. Through the use of a few key types of tickets, and several Agile Boards, we created manageable views for both the development teams, management teams and client.
In the following articles, I will refer to the following roles:
- Program Manager (PGM) – PGM control scope of project deliveries, costs, and communication of with client. They work with the client directly to gain clarity of what is priority and identify any critical drop-dead dates.
- Project Manager (PM) – PM defines resources required for successful delivery, follow-up on day-to-day activities of individual team members and identify any red flags to PGM as soon as possible. PM is responsible for gathering estimations and establishing final scope of a sprint based on Story priority by PGM and team velocity.
- Business Analyst (BA) – BA takes a story and breaks the requirements down to manageable size and works with client to clarify any items unclear. BA transfer requirements to the Team Leads (TLs) and PMs for proper estimation.
- Technical Team Lead (TL) – TL manages a team of developers.
- Quality Control (QC) – QC is responsible for testing and verifying the quality of the release before delivery.
OK, OK enough blabbing, let’s talk about the solution.
In this article, we will talk about the JIRA side of the solution. JIRA, out of box comes out of box with many ticket types. In our solution, we used the following ticket types:
- Story: This is the starting point of any request. This will be used by the PGM and Client to identify Priority and deadlines (if there is a fixed drop dead date). Example is a new marketing campaign for Back to School.
- Task: This type will be used by the team to breakdown requirements into manageable parts of the original Story. This should not be used to define what each functional team (JAVA, HTML, QC) performs but what is expected delivery. An example of manageable part of a story is Create a new Banner for Back to School.
- Sub-Task: This type is used to break down the Task into functional teams. For example, if the Task is to create a new banner, we will have following Sub-Tasks:
- Content Checker Review Content
- Designer Review Quality and Fix Copy if Needed
- HTML Team Cut Banner and apply Image Mapping
- Content Editor deploys new banner
- Sub-Task: This type is used to break down the Task into functional teams. For example, if the Task is to create a new banner, we will have following Sub-Tasks:
- Issues: this is used to collect problems initially identified by the client but not verified yet by our team.
- Bug: After an issue is verified by QC, it is converted into type Bug for resolution.
- Internal Bug This was our only custom ticket type and is a mirror of Bug schema but used for internal bug identification.
To improve the organization of the JIRA tickets into Agile Sprint Boards (to be discussed in a later blog) we need to dive into one of the attributes of all tickets, Components.
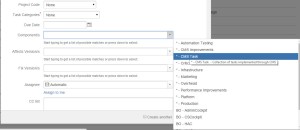
Components is a multi-select attribute that you build in the Administration view of your JIRA Project. Let me create a ticket to give you a visual. In this example, we will create a new ticket of type Task:

This field allows you to select one or more predefined values by either by expanding the drop-down menu or use a method called “Find as you type”. Either method displays a list of values you can select from:

Typically, you would use components to define a specific function, feature, or area that you would categorize requests or issues into. We will also use it this way for our project, but additionally enter special entries for the story board filtering.
- To begin, make sure your account has administrator rights to your project.
- In JIRA, open your project’s home page, similar to shown below:
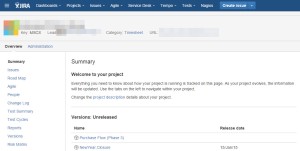
- Just below the Project home page header, you will see 2 words, Overview and Administration. Select Administration to see the following view:

- On the left side, locate the link Components and click on it.This will provide a list of components configured on your project. If this is a new JIRA project, or you have not used this feature before, the page will be empty. Below is displayed of an established site:

- Each component has various attributes you can configure:
- Name, This is what is displayed in the menu and when user performs actions such as filtering. NOTE: All listings in sites are returned alphabetically where special symbols, are shown followed by number then alphabet. This is helpful to know if you want to display certain entries first which I will discuss later.
- Description This is displayed in 2 areas of your project:
- In project overview page of Components

- When you are modifying a ticket and have the Components menu expanded, you can hover mouse over an entry to see the description in tooltip
- In project overview page of Components
- Component Lead this is who owns that area of the project. Very useful for automatic assignment of tickets on creation (see next bullet).
- Default Assignee When a ticket is first created, it’s Assignee attribute is commonly set to Automatic by default, This means based on some business logic, the ticket will be assigned to an individual based on some business rule, commonly Component configuration. In this case, if a component is selected in a ticket, it could auto assign based on following rules:
- Project Default this is based on project configuration, which could be either be Project Lead or Unassigned (meaning no assignee identified).
- Component Lead
- Project Lead
- Unassigned


In our story, I mentioned we have 2 key silos, Production & Marketing and Platform. To improve organization in the future, I am going to create the following Components:
- * – Marketing
- * – Production
- * – Platform
- * – Overhead
Why did I include “* – ” you might be asking? If you remember earlier, JIRA tickets (and other locations as well) organize components alphabetically. Using the * – means that these critical components will always be at the top of my drop down menu when modifying tickets, even when my list of components are greater than 15 items (point at which list is cut off and user needs to use Find as you type feature to find other components) these key components are still displayed for ease of access.
We have now successfully added a mechanism to successfully established the necessary building blocks to organize the tickets into logical silos.
In my next blog, I’ll discuss Agile Sprint Boards and how components we just learned about, becomes the cornerstone of the overall solution.
Read more about the Atlassian Solution below:
Bring Calm to Chaos, a success story with Atlassian Tools

Pingback: Bring Calm to Chaos, a success story with Atlassian Tools (the theory behind the solution) | Everything about Nothing in a world about Everything
Pingback: Bring Calm to Chaos, a success story with Atlassian Tools (creating an JIRA Agile Sprint Board) | Everything about Nothing in a world about Everything
Pingback: Bring Calm to Chaos, a success story with Atlassian Tools (creating sprints and the lessons learned) | Everything about Nothing in a world about Everything
Pingback: Bring Calm to Chaos, a success story with Atlassian Tools (How we estimated) | Everything about Nothing in a world about Everything
Great 😉
LikeLike